
deborah's buttonhole tips
|
Vertical 4-Row added May 12, 2016
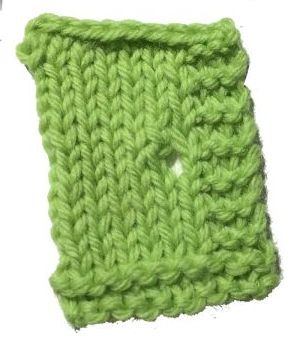
Buttonhole in gauge swatch When knitting your swatch, create the desired buttonhole in the swatch using the appropriate needle and pattern. Be sure to use the pattern in which the buttonhole will be created, i.e., a button band, garter stitch, etc. Now you need to just take the swatch to the craft store when purchasing button. This example will show you how to create a buttonhole over 4 rows with a very tidy result. To try this, create a small swatch with a 3-st border.
Buttonholes are not always as neat and tidy as we would like and placement can be an issue. Here is an “after-the-fact” buttonhole. Beth Caulfield, formerly of Sheep Thrills, brought this to us from Denver, Colorado. Work your buttonbands as you normally would without buttonholes. Sew your buttons on to the buttonband. Using the center of the button as a guide, determine where you first buttonhole will be.
Work the required number of stitches before starting the buttonhole. 
As if to knit, slip one stitch. Between the tips of the needles, bring the yarn to the front of the work and drop it. As if to knit, slip the next stitch from the left-hand needle to the right-hand needle and pass the first slipped stitch over the second slipped stitch and off the needle. Not using the dropped yarn, bind off the required number of stitches in this manner. Slip the last stitch on the right hand needle back to the left needle. Turn the work around. Bring yarn to the front. At the edge where the buttonhole was started, using the twisted method of casting on purlwise, cast on one more stitch than the number that you bound off. (Twisted method of casting on purlwise: Insert right hand needle into the next stitch on the left hand needle through the back loop. Wrap yarn around needle in the same way you normally would to purl and complete the purl stitch. This twists the stitch. Pull the loop through and place this new stitch on the left needle. Continue until you have cast on the number of stitches you need.) Turn the work around. Slip the first stitch from the left hand needle to the right needle as if to knit. Slip the extra cast on stitch over the next stitch and then slip this stitch back onto the left-hand needle. This example is worked on one row only over three stitches.
To make the stitches a bit tighter, try this. Instead of four (4) backward loops, make three (3). On the next row, knit to the third cast on stitch. Loop the yarn that is between the second and third stitches around the left-hand needle from back to front and knit it. |


 Bring yarn forward and leave it there.