- When using small needles, especially those 000’s and 0000’s, cast on over 2 pair of needles. Then carefully remove one of the needles. It makes knitting that first row easy!
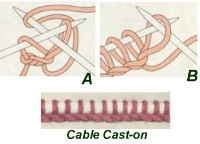
- Cable Method of Casting On

Cable cast on is formed in the same way as knitting on, except for each new stitch, the needle is inserted between the two previous stitches. The resulting edge is decorative and relatively elastic.
Make slip knot and knit first stitch on. For each new stitch after that, insert the right needle between 2 stitches; wrap yarn as for knitting(A). Draw through a new stitch and transfer it to left needle(B).
- Casting on in the round: When making small objects or items that begin in the center, we have to cast on just a few stitches. This can be a challenge. First, you will need a crochet hook the same size of the required knitting needles. (Every knitter should have a set of crochet hooks.) Second, you may want to invest in 4" or 5" double-pointed needles. They make knitting small items much easier.
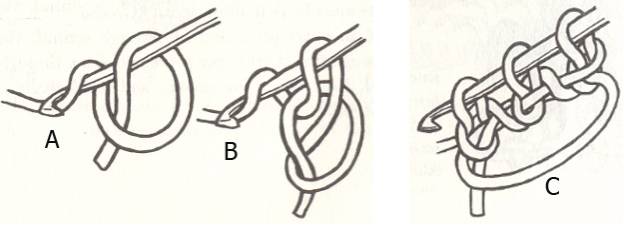
Method 1—Emily Ocker’s Circular Beginning
 First, you are going to make a ring with the required number of stitches, only these are going to be crocheted. First, you are going to make a ring with the required number of stitches, only these are going to be crocheted.
1. Make a loop. Do not pull it tight; keep it loose. Grasp the loop where the strands meet with your left thumb and index finger.
You can make the loop with the tail going up. You will then have to weave in the tail.
2. Insert the hook into the loop from front to back. Grab the yarn with the hook (yo) and bring through the loop. You now have one loop on the hoop.
3. Insert the hook into the loop again; you will be going under the yarn tail as well. Hook the yarn (yo) and bring through the loop. Hook the yarn again and bring through the loop on the hook as if you were making a chain. You now have two loops on the hook. Repeat this step until you have the required number of loops.
4. Carefully replace the hook with your needles and begin knitting in the round. After you have finished a few rounds, pull the tail to close up the circle.
You now have a nice, tight circle with no hole in the middle and the end worked in.
—updated January 7, 2017
Crocheters! Check here for a similar method to begin crocheting in the round.
Method 2
Cast on the required number of stitches and divide evenly between two needles, not the usual 3 or 4 needles. Using a third needle, knit in the round for a few rounds. If the pattern includes increases, when you have 12 or more stitches, it will probably be comfortable for you to now introduce another needle. Think "Magic Loop," only with double pointed needles.
—added April 23, 2011 (first posted on sheepthrillsyarncompany.com January 2011)
Method 3
Make a slip knot, leaving a 12" tail. The knot should be snug, not tight. Hold the knot in the left hand and the needle in the right hand. *Yarn over (1 st created); insert the needle into the slip knot’s loop, wrap yarn around needle and pull through the loop (another st created). Rep from * until you have the desired number of stitches. After you have knitted 3 or 4 rounds, pull the tail of the slip knot to close up the hole.
—revised March 19, 2013 from "Knitting in the Round" by the House of White Birches, pg. 162
Disappearing Cast-on
This is a great cast-on when you need a closed hole in the center. You will need a 2-1/2" weaving needle.
See the directions here.
—added October 22, 2013 from Knitting from the Center Out
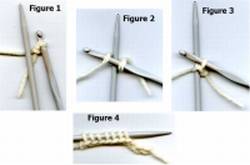
- Crochet cast-on. This creates a cast-on edge that matches the standard bind-off. See Provisional Cast-on for the images 1, 2, and 3. Image 4 does not apply to this cast-on
- Make a slip knot and place it on a crochet hook the same size as the needles. (Figure 1)
- With yarn in back of the knitting needle, bring the hook over the top of the needle (Figure 2), catch the yarn and pull it through the loop on the hook. (Figure 3) Repeat this step until the number of stitches desired has been cast on.
—added May 17, 2019
- E Cast-on: See Loop Cast On
- Elastic K1, P1 cast-on. This uses the cable cast-on method for both the knit and purl stitches. It produces a firm, elastic border. Berroco has a video to show you how this is done.
—added May 28, 2011
- Judy's Magic Cast On: A way to cast on with a grafting method. It make take a few times to accomplish this but is well worth the effort. This is a link to the best video I have seen that demonstrates Judy Becker's method.
—added July 22, 2017
- Judy Becker’s Cast-on on double-pointed needles
This creates a rounded toe and is so easy to do once you get the hang of it. It is the toe-up equivalent of the Star Toe.
Video by Cat Bordhi
Written directions (Download in .pdf format):
- Make a slip knot with a 6" tail and put it on the bottom needle.
- Wrap the working yarn around the needles three times by going to the back of the top needle and then over the top and towards you (Figure 1).
- With working yarn, knit the three stitches on the top needle.
- Rotate the needles so the slip st is on the top needle.
- Remove slip knot and undo so that you can knit with the yarn tail. With both yarn tail and working yarn, knit 3 stitches on each needle. You now have 12 stitches. (Figure 2)
- With working yarn, knit one round. In Figure 3, you can see the way the stitches flow over the toe.
- Next round: *K1, kfb (knit in front and back of stitch); repeat from * around (18 stitches).
Optional: Use a lifted increase instead: K1, right-slanting lifted increase in next stitch; knit that stitch
- Knit one round.
- Next round: *K2, kfb (knit in front and back of stitch); repeat from * around (24 stitches).
Optional: Place a marker after every increase.
- Repeat the last 2 rounds increasing 6 stitches each round until you have the desired number of stitches. Move to 3 or 4 needles when you have enough stitches to knit comfortably.
—revised August 28, 2012
Judy Becker’s Cast-on on double-pointed needles
This creates a rounded toe and is so easy to do once you get the hang of it. It is the toe-up equivalent of the Star Toe.
Video by Cat Bordhi
Written directions (Download in .pdf format):
- Make a slip knot with a 6" tail and put it on the bottom needle.
- Wrap the working yarn around the needles three times by going to the back of the top needle and then over the top and towards you (Figure 1).
- With working yarn, knit the three stitches on the top needle.
- Rotate the needles so the slip st is on the top needle.
- Remove slip knot and undo so that you can knit with the yarn tail. With both yarn tail and working yarn, knit 3 stitches on each needle. You now have 12 stitches. (Figure 2)
- With working yarn, knit one round. In Figure 3, you can see the way the stitches flow over the toe.
- Next round: *K1, kfb (knit in front and back of stitch); repeat from * around (18 stitches).
Optional: Use a lifted increase instead: K1, right-slanting lifted increase in next stitch; knit that stitch
- Knit one round.
- Next round: *K2, kfb (knit in front and back of stitch); repeat from * around (24 stitches).
Optional: Place a marker after every increase.
- Repeat the last 2 rounds increasing 6 stitches each round until you have the desired number of stitches. Move to 3 or 4 needles when you have enough stitches to knit comfortably.
—revised August 28, 2012
- Knit cast-on. This is especially useful when casting on in the middle or at the end of a row or round. When beginning a project, begin with a slip knot which will be the first stitch.
- Step 1: Knit the next st and leave on needle.
- Step 2: Insert the tip of the left needle into the new st and slide to left needle.

—added February 15, 2015
- Loop Cast On (Backwards Loop)
This cast on traditionally is the first method the new knitter learns. It is incredibly easy but leaves a sloppy first row with large loops hanging. This method is also popular for working buttonholes. The next time you use this method, cast on fewer stitches than required. The number will depend on on how many total stitches you need. Now, as you knit that first row, when the yarn between stitches is long enough, loop it around the left-hand needle and knit it. Your first row will be a lot neater.
—added January 17, 2012, Betty Smith, Twisted Stitches
- Long Tail Cast On
- Often, we run out of the “tail” when casting on a large number of stitches. To avoid this, use one end of the skein as your working yarn and the other end (or another ball of yarn) as the tail and cast on. Your yarn tail will never be too short again!
—added January 17, 2012, Esther Bozak, Twisted Stitches
- The tail of the yarn, when using a long-tail cast on, should be about 4 times the width of your finished edge.
—added March 16, 2013
- Moebius cast on
When knitting a Moebius, use the Moebius cast-on. Otherwise you will end up with a faux moebius. Find Cat Bordhi’s excellent video here.
—added February 23, 2013
- Picot cast on

This results in a very nice border with picots. Try this example.
- Using a cable cast-on or other knit cast-on, cast on 4 stitches.
- Now we are going to begin a 5-stitch picot. Cast on 5 more stitches. Bind off 5 stitches. (Try the modified conventional bind-off; once learned, it is faster.) Slip the stitch from the right- to the lefthand needle by inserting the lefthand needle in the stitch from front to back.
You now have 4 stitches.
- *Cast on 9 stitches (4 stitches plus the 5 stitches for the picot). Bind off 5 stitches. Slip the stitch from the right- to the lefthand needle by inserting the lefthand needle in the stitch from front to back. You have just added 4 stitches to the total cast on.*
- Repeat between * * until you have 4 stitches less than the total desired.
- Cast on 4 stitches.
—added November 8, 2011 from Lucy Neatby’s Knitting Gems
- Provisional cast on

This is one of the easiest provisional cast ons I have found. Also, it can also be used if you want the cast on edge to match a conventionally bound off edge.
- Using a smooth yarn in a contrasting color, make a slip knot and place it on a crochet hook the same size as the needles. (Figure 1)
- With yarn in back of the knitting needle, bring the hook over the top of the needle (Figure 2), catch the yarn and pull it through the loop on the hook. (Figure 3) Repeat this step until the number of stitches desired has been cast on.
Step 3: Chain a few stitches. Cut the yarn and pull through the last chained stitch. When you are ready to unravel the waste yarn, this will be the end that you gently pull to remove the waste yarn.
- Fiigure 4 shows the completed cast on.
—added December 1, 2011 from Lucy Neatby’s Knitting Gems 4
- Finishing by pulling the yarn through live stitches
Often, at the tips of mittens or on sock toes, the yarn has to be pulled through live stitches, pulled snug and fastened off. If you are working in the round, simply continue in the round, pulling the yarn through beginning with the first stitches in the round (not the last stitch worked). If you are working on 2 needles, slip the stitches to the second needle and then pull the yarn through, in effect
“working around.” The finishing will be a little smoother.
—added December 4, 2012
|


