- 2-stitch I-cord Bindoff

 This bind-off creates a nice top edge. The front and back are the same.
When ready to bind off, cast on 2 sts. In the example, I used a backward loop (or e cast on) since I needed only 2 sts. *Knit 1 sts; k2 tog the second stitch and one to be bound off); slip the 2 sts back to the left hand needle.* Repeat until all stitches are bound off.
—added June 28, 2016
- Casting-on Casting-off

Similar to the Sewn Cast-Off, this is useful for a garment knit from the neck down.
Break the yarn and thread a blunt needle with it. Hold work with the right side towards you, with yarn coming from left end. Work from left fo right: *Keeping working yarn above, go into the second st from front and first st from back. Pull yarn through both sts. Slip first st off. Rep from *.
—added March 22, 2013
-
 Color Bind off Color Bind off
Bind off in the same color yarn until 1 st before the color change. Knit that st with the new color. Continue binding off until 1 st before the color change. Knit that st with the new color. Continue in this manner until all stitches are bound off.
—added April 3, 2018
- Finishing by pulling the yarn through live stitches
Often, at the tips of mittens or on sock toes, the yarn has to be pulled through live stitches, pulled snug and fastened off. If you are working in the round, simply continue in the round, pulling the yarn through beginning with the first stitches in the round (not the last stitch worked). If you are working on 2 needles, slip the stitches to the second needle and then pull the yarn through, in effect
“working around.” The finishing will be a little smoother.
—added December 4, 2012
- Interlock Bind Off: A sewn bind-off for stockinette stitch that is very stretchy, this was developed
by Jeny Staiman, who also developed the Surprisingly Stretchy Bind Off for ribbing.
It will surely elicit an “Oh my!” from most knitters.
- Cut a tail four to five the length of the edge to be bound off and thread onto the tapestry needle.
- *Insert the tapestry needle through the first stitch on the left-hand needle knitwise and remove the stitch from the needle.
- Insert into next stitch purlwise leaving the stitch on the needle and leaving small loop before the stitch just dropped.
- Bring the tapestry needle through the loop from back to front and pull snug.
- Repeat from * until one stitch remains. Insert the tapestry needle through this final stitch knitwise and remove from the needle. When knitting in the round and a more professional finish: For the very first stitch only, after you go back through it, move it to be the last stitch on the final needle. It will then become the final stitch to be cast off.
—added September 8, 2012 from Cast On Bind off, Leslie Ann Bestor
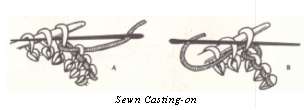 Sewn Cast-off: A nice, elastic end to the knitted piece; especially good when knitting sweaters from the neck down. Break yarn and thread through a blunt needle. Work from right to left. *Put needle through first 2 sts from right to left and pull through (A). Put needle back through first st from left to right, pull through and slip st off (B). Rep from *. Originally from Elizabeth Zimmermann’s Knitting Without Tears. Sewn Cast-off: A nice, elastic end to the knitted piece; especially good when knitting sweaters from the neck down. Break yarn and thread through a blunt needle. Work from right to left. *Put needle through first 2 sts from right to left and pull through (A). Put needle back through first st from left to right, pull through and slip st off (B). Rep from *. Originally from Elizabeth Zimmermann’s Knitting Without Tears.
- When knitting in the round and for a more professional finish: For the very first stitch only, after you go back through it, move it to be the last stitch on the final needle. It will then become the final stitch to be cast off.
- Russian Bind-off: *P2 tog, slip the resulting stitch on the right hand needle to the left hand needle, repeat from * across. Results in a nice elastic edge. Be sure to purl fairly loosely or use a needle one or two sizes larger.
from Spinerella on the Knitter's Review forum
- Bind off a slope: When binding off a sloped edge like a shoulder, the groups of stitches form stair steps. This edge can be smoothed by slipping the first stitch of each group before binding it off. To do this, bind off the first group as usual. When it is time to bind off the next group, slip the first stitch knitwise, knit the following stitch, pass the slipped stitch over the knitted stitch and off the needle, then continue to bind off the rest of the stitches in that group normally. Repeat this at the beginning of each group of stitches.
—added November 6, 2011
- Modified Conventional Bind-off
This is much faster than the conventional “pass stitch over” method. The results are a little smoother and a little stretchier too.
- on a Purl Row
Purl the first stitch. *Slip it purlwise back to the left needle.
P2tog. Repeat from * to end.
- on a Knit Row
 Knit the first stitch.
*Insert the left-hand needle into the back of the stitch on the right-hand needle (Figure 1).
Insert the right-hand needle into the next stitch on the left-hand needle (Figure 3).
Slip both stitches off the needle. Repeat from * to end.
—added November 8, 2011 from Lucy Neatby’s Cool Socks Warm Feet
- Not-Too-Tight Bind off
If your conventional bind offs are not loose enough, try binding off with a needle one or two sizes larger.
—added June 29, 2012
 Last stitch sticks out Last stitch sticks out
Sometimes the last loop at the end of the bind is sticks out. Instead of cutting the yarn and threading it into the last stitch to prevent unraveling, enlarge the last stitch, cut the yarn and pull it out.
—added March 24, 2013
- Loopy-Last-Stitch Fix
To eliminate a long and loopy last stitch on the bind off row, slip the first stitch of the of the row before the bind-off row, working the rest of the row as usual. Turn and bind off the row, working and binding off the slipped stitch as usual.
—added March 25, 2013 from Donna Kooler’s Encyclopedia of Knitting
- Loose bind off
- Method 1: Add extra yarn overs while binding off: K1, *YO, pass stitch over, K1, pass stitch over*. Repeat between * * until all stitches are bound off. Use along an edge that needs stretch, like the neck of a sweater. A better method is Jeny’s the Surprisingly Stretchy Bind Off.
- Method 2: For less stretch, yarn over after every second on third stitch. For more stretch, add more yarn overs to form a chained loop between stitches.
—added March 25, 2013
- Picot Bind-off
This bind off is decorative and stretchy.
You can increase the number of bound-off stitches between the picots and/or lengthen the picots (just by increasing more stitches).
- Bind off 3 stitches: K2 sts. *Bind off one stitch by bringing the first stitch on the right-hand needle over the second and off the needle; k1. Repeat from * 2 more times, omitting the last k1.
- Return the stitch to the left-hand needle knitwise
- *Knit the first stitch and place the new stitch on the left-hand needle knitwise. Repeat from * 1 more time (2 new stitches).
- Bind off 5 stitches: K2 sts. *Bind off one stitch by bringing the first stitch on the right-hand needle over the second and off the needle; k1. Repeat from * 4 more times, omitting the last k1.
- Repeat steps 2 – 4 across row. When one stitch remains, cut yarn and pull through loop.
—added Februay 16, 2015
- Short-Row Bind off
This is a great bind-off for shoulders and will avoid the “stairs effect” and result in a smooth bind-off for weaving or even, live stitches for a 3-needle bind off.
Let's use typical directions for a sweater:
Bind off 5 sts at the beginning of the next 4 rows.
Bind off 4 sts at the beginning of the next 2 rows.
Bind off remaining sts.
Now, let's use short rows instead.
- Knit to the last 6 sts and wrap & turn (w&t). Click here to read about this technique.
- Purl to the last 6 sts and wrap & turn (w&t).
- Knit to the last 11 sts (6 sts in Step 1 and 5 sts from the third row of the bind-off) and w&t.
- Purl to the last 11 sts and w&t.
- Knit to the last 15 sts and w&t.
- Purl to the last 15 sts and w&t.
- Knit across row to the first wrapped stitch. Lift the wrap over and behind the stitch and knit the wrap and the stitch together. Continue knitting to the end of the row knitting the wraps and the stitches together.
- Bind off 14 sts in pattern; purl to the end of the row, purling the wraps and the stitches together.
- Bind off 14 sts in pattern. Place the remaining sts on a stitch holder. When you are ready to pick up stitches for the neckband, you will have live stitches. No picking up necessary!
—added January 23, 2016
- Tubular Bind off for 1 x 1 ribbing
On the last row of ribbing, knit every knit stitch and slip purlwise every purl stitch. Then bind off using the Kitchener stitch.
—added February 6, 2015
- Tubular Bind-off for Double Knitting
Knit 2 rows in tubular st st.
- Row 1: *sl1 1 pwise wyif, K1 rep from * across row.
- Row 2: K the slipped stitches and sl the k sts wyif.
Graft the front layer (the knit stitches) to the back (which look like the purl stitches from the inside).
- Place the front (knit) stitches on a double pointed needle (dpn); place the back (purl) stitches on another dpn.
- Thread a yarn or tapestry needle with a length about 4 times the width of the edge to be bound off.
- Insert the needle into the first stitch of the front needle as if to purl. Pull the yarn through and leave the stitch on the knitting needle.
- Insert the needle into the first stitch on the back needle as if to knit. Pull the yarn through and leave the stitch on the knitting needle.
- *Insert the needle into the first stitch of the front needle as if to knit. Slip the stitch off the knitting needle and onto the yarn needle.
- Insert the needle into the next stitch of the front needle as if to purl. Pull the yarn through and leave the stitch on the knitting needle.
- Insert the needle into the first stitch of the back needle as if to purl. Slip the stitch onto the yarn needle. Insert the tapestry needle through the next stitch on the back needle as if to knit. Pull the yarn through leaving the stitch on the needle.
- Repeat from * until all stitches are joined.
The yarn should be pulled so that the stitches have the same tension as the knitted stitches.
—added January 23, 2016
|